
Solar Modulith
Project URL: https://solarmodulith.com/
Let's start with some history. Throughout my career, I have worked on many Big Balls of Mud.
The term Big Ball of Mud
was introduced in 1999 by Brian Foote and Joseph Yoder, and we are still talking about it 27 years later. In
July 2025, Geeks For Geeks
published the article
Big Ball of Mud
Anti-Pattern.
The article points out some common misconceptions about a Big Ball of Mud. Two in particular are that it is the
result of poor design and/or that it is a sign of incompetence. Both are false. I've worked at some
great companies with some incredible people, but yet it still happened.
In the Spring of 2025, I began to explore the idea of creating an application that could evolve over time and
not go down that same road. That gave birth to the Solar Modulith.
What's in a Name?
The name of the Solar Modulith is derived from the domain I selected as well as one aspect of the
backend architecture. In order to build an application, I needed a domain. Given my experience at
Aurora Solar,
I selected the solar industry. As for the term Modulith, the backend server is based on a modular
monolith, which is commonly referred to as a modulith.
Current State
The Solar Modulith already has lots of infrastructure support as well as features. Like commercial applications,
though, it will never be complete. It will always be a place where I can experiment with different ideas
and architectural patterns. Current plans are to improve and enhance the backend and to add solar pricing
to the frontend/backend.
Can I Use the Solar Modulith?
Yes, you can use with the Solar Modulith.
You'll need to create a free account. It's easy to do and no personal information is ever requested. If you are not
familiar with the solar industry, here are few things to keep in mind that will help when using it:
- Pretend that you own a solar installation company that installs PV systems (solar panels) onto the roofs of homeowners.
- You operate in one or more service regions. If you have a small company, you might only operate in one area, say Minneapolis. If you have a large company, you might operate in multiple places throughout the country, e.g. California, Texas, Florida, etc. Service regions are defined with a set of zip codes.
- You have warehouses. Your warehouses have the solar panels, inverters, and batteries that get installed at a customer's home. Warehouses are associated to your service regions. Let's say that you have a service region in California and another in Florida. Each of those service regions would have its own warehouse. Furthermore, since the climate and regulations are different, those two warehouses would stock different types of solar panels, etc.
- Next, we have projects and designs. Let's suppose you have a potential new customer. You would start by creating a project for that customer. You would also assign that project to yourself or one of your sales reps. Most importantly, the project has the address of the home where the PV system will be installed. Once you have a project for that customer, you can create a set of designs (or design proposals). Each design is based on different solar panels, inverters, etc. If this was an actual production application, you or your sales rep would work with the customer to select a particular design to be installed.
- Lastly, to help make it easier to use, your Solar Modulith account will be automatically populated with fake data.
When time permits, more features and improvements will be added to the application.
One final word: the Solar Modulith is not a commercial application. It is for demo purposes only and does not
have
the features needed for a commercial application. If you are looking for a commercial application, please
take a look at
Aurora Solar.
Tech Stack
Frontend Tech Stack
The frontend uses the following technologies:
- Typescript
- React/Redux
- Tailwind CSS
- Axios
Backend Tech Stack
The backend uses the following technologies:
- Kotlin: I like statically typed languages and Kotlin has exceptional built-in support for null safety. It is also compatible with Java.
- Spring Boot: an excellent framework for security, persistence (JPA), and dependency injection.
- JSON Web Tokens (JWT): Used for authentication.
- Postgres: relational database
- Liquibase: for managing the database schema
- RabbitMQ: used for events and queuing background jobs
- RPC: used for the Web API.
- GraphQL: used by clients for performing queries
- jOOQ: library for writing SQL in Java
- Docker: for running RabbitMQ, Redis, and Postgres locally. Also used to bundle and run the app in production.
- GitHub Actions: runs automated tests on each commit and deploys the docker image to AWS's ECR
- AWS: the Solar Modulith is deployed to AWS
- AWS CloudFormation: an Infrastructure as Code (Iac) that manages the AWS resources needed for the Solar Modulith.
- ArchUnit: used to enforce architectural boundaries
- Gradle: an automation tool for compiling, testing, and building the application
- Testcontainers: used for running integration tests
- Doppler: an online service for storing secrets and configuration across different environments
Core Features & Capabilities
The heart and soul of the Solar Modulith is the backend architecture. The following gives a quick overview
of the core features and capabilities.
- Modules
- are like microservices and are completely independent
- can communicate synchronously in order to complete a business workflow
- use the same database
- Security
- Authentication: supports username/password with JSON Web Tokens (JWT)
- Authorization: currently under development
- Web API
- based on the Slack Web API
- focuses on business workflows (CRUD is a subset)
- Domain Model
- based on Domain-Driven Design (DDD) aggregates
- Hexagonal (Ports & Adapters) Architecture
- prevents the database layer from bleeding into the business code
- Vertical Slices Architecture
- provides cohesion by keeping the business code for a workflow together
- Event-Driven Architecture
- modules can publish asynchronous events
- modules can subscribe to asynchronous events
- Background Jobs
- allows for long-running jobs to be run asynchronously
- Command Query Responsibility Segregation (CQRS)
- keeps commands and queries separate
- GraphQL is used for queries
The Inner Workings
The following sections dive into the inner workings of the Solar Modulith.
Security
As with any application, security is paramount, so let's start with that.
Networking
All network traffic flows over HTTPS. This includes all traffic to/from the web application and the
internal traffic in AWS between the load balancer and the Solar Modulith EC2 instance.
Authentication
Authentication currently only supports a username/password only. The password is hashed using Spring
Security's
BCryptPasswordEncoder before being stored in the database.
JSON Web Tokens (JWT) are used for authentication. The implementation adheres to the following:
- The access token adheres to:
- The expiration time is configurable but should be configured to expire within five to fifteen minutes in case it is stolen.
- The access token is stored in memory on the browser. It is never stored in the browser's local storage or session storage.
- The access token must be passed in the HTTPS Authorization header as a Bearer token for all requests
except the following:
- /actuator/health
- /login
- /logout
- /refresh-token
- /public/**
- The refresh token adheres to:
- The expiration time is configurable but should be configured to be much longer than the expiration of the access token. The actual value is application specific but could be hours to even days.
- The access token is only stored in a cookie with the following properties:
- HttpOnly: prevents client-side scripts from access the token
- Secure: cookie is only transmitted over HTTPS
- MaxAge: cookie expires based on refresh token expiration
- When the access token expires, the client application must use the refresh token to obtain a new access token. A new refresh token is also generated at that same time and the old one is revoked. If a bad actor gets an old refresh token, it will be useless.
Authorization
Authorization is still a work-in-progress, but it is an important topic to discuss. Authorization addresses
two fundamental questions:
- What can a user do?
- What resources can a user access?
Let's start with the first question: what can a user do? There are different solutions to this question and it
is
very application specific. Different applications have different needs. One solution is to have a set of
pre-defined
roles. For an example, let's suppose the Solar Modulith has the following roles: Account Administrator,
Warehouse
Manager,
and Sales Rep. In the code, we might allow the Account Administrator and the Warehouse
Manager
to modify the contents of a warehouse. The Sales Rep, though, cannot.
Of course, that solution requires that the roles all be defined up-front and that developers may need to check
against various roles in order to allow a particular action. In the above, we need to check for either the
Account Administrator and the Warehouse Manager for modifying a warehouse. If we later introduce
the role Warehouse Associate, we need to add it throughout the code base. A better solution is to
assign
a set of permissions to a role. For example, the Account Administrator and the Warehouse Manager
could
both be assigned the warehouse_update permission. Likewise, if we later create the Warehouse
Associate
role,
we only need to assign it the warehouse_update permission. No code changes would be necessary. This has
the added benefit of allowing end-users to create their own custom roles. They need only assign permissions to
those custom roles.
Let's move on to the second question: what resources can a user access? Let's suppose that Bob is a
Warehouse Manager in California. They would need to be able to modify the contents off the California
warehouse.
But what about the warehouse in Florida? What if we want to prevent Bob from modifying the contents of the
Florida warehouse? A common solution to this problem is an Access Control List (ACL). Bob would have his own
ACL and the California warehouse would be on the list. By having the warehouse_update permission and
access
to the California warehouse, he can change its contents. The Florida warehouse, though, is not in his ACL.
Thus,
can can't modify its contents.
Let's take one final step. Let's introduce the warehouse_read permission which Bob and every
Warehouse Manager has. We only want Bob to be able to update the contents of the California warehouse,
but we also want him to be able to view, but not change, the contents of the Florida warehouse. Since the
Florida warehouse isn't in his ACL, he won't have any access to it, including viewing it. But if we add the
Florida warehouse to his ACL, he'll be able to update its contents and we don't want that. I'll stop here.
There are different solutions to allow different operations based on the resource, e.g. warehouse. I've not
yet
decided which to use. The key take-away from this discussion is that I'll be focusing on giving end-users the
maximum flexibility.
Modules
If we don't want a Big Ball of Mud, why are we building a monolith? In
START with a Monolith, NOT Microservices,
Derek Comartin advocates starting with a monolith instead of microservices for greenfield projects.
The reason for this is that we really don't fully understand what we are building. In regard to
the Solar Modulith, I know something about the solar industry, but I'm not a domain expert.
Plus, when I started, I wasn't even sure what the architecture would be. The early stages of any
application should be focused on learning.
In the end, it's about boundaries as Derek Comartin describes in
Long live the Monolith! Monolithic Architecture != Big Ball of Mud
Modules define those boundaries. The following shows the high-level view of modules within
a modulith.
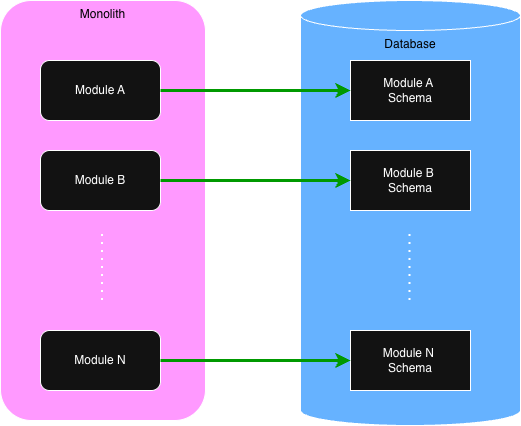
Of importance, note that while there is only one database, each module has its own schema and is responsible for
maintaining the
data within. When we discuss queries in a later section, we'll see how queries can query across the entire
database,
not
just a single module's schema.
All business logic within an application resides within the modules. Each module provides an API that is
used for executing business processes. Like microservices, each module is independent. There are no code
dependencies between them. They can communicate with each other to complete a task, but they never share code.
What's in a Module?
Like microservices, deciding what goes into a module vs another is a process of discovery. The benefit of a
modulith is
the ability to easily move functionality around between modules. Personally, I use the following two
guidelines when I'm starting out:
- Place an aggregate or a group of related aggregates into a single module.
- If a use case involves multiple aggregates, create an orchestration module for that gives commands to the other modules.
Module Code Structure
Let's start with a diagram showing the recommended top-level folder structure of a module.

| Folder | Description |
|---|---|
| init | Only needed if the module must perform some initialization when the application starts. |
| common | Contains code that is common to the business logic. The repository interface (port) as well as validation code can usually be found here. |
| domain | Contains the domain object classes. |
| tasks | The tasks handle requests from other modules. Tasks are used by other modules in order to fulfill a use case. It is recommended that each task be in its own subfolder. |
| usecases | As the name indicates, the use cases contain the business processes. Like tasks, it is recommended that each use case be in its own subfolder. Use cases are invoked either via a Web API call or from a published event. Events are handled as use cases. For example, creating an employee is a single use case initiated by a Web API call. Sending the new employee a welcome email is another use case that is executed in response to a new employee event. |
| repository | Contains the implementation of the repository interface (port). When using Spring Data and JPA, there must be a persistence subfolder containing the JPA entities and JPA interfaces. The code in the repository should never contain business logic. It is simply for reading and saving aggregates and for querying. |
💡
The recommended module folders are not meant to be rigid. Folder names can be changed. Other folders can be
added if necessary. Also, the subfolders within these top-level folders can be anything that helps with the
organization of the code. For example, if a set of use cases are related, a parent use case folder can be
used to contain those related use cases.
Database Migrations
Every module is responsible for its database schema.
Liquibase
is used for handling database migrations. Given that, each module that stores data in the database
must have a set of Liquibase scripts in the
src/main/resources/migrations folder.
The following is an example of the Liquibase files that might be needed for an employee module.
employee-changelog.xml
001-create-employee-table.xml
002-add-ssn-column-to-employee-table.xml
Domain Model
Within the Solar Modulith, there are two core guidelines for the domain model:
- Use aggregates as described by Domain-Driven Design (DDD)
- Use a Rich Domain Model instead of an Anemic Domain Model
To illustrate this, we'll use the Warehouse domain object from the Solar Modulith. For a quick reminder, a
warehouse is a physical building that stores the solar panels, inverters, and batteries needed for installing
a PV system onto a homeowner's roof. Within the
domain folder, we might have the following:
class Warehouse private constructor(
  val id: UUID,
  val tenantId: UUID,
  private var name: String,
  private val solarPanelIds: MutableSet<UUID>,
  private val inverterIds: MutableSet<UUID>,
  private val batteryIds: MutableSet<UUID>
) {

  companion object {
    fun of(id: UUID, tenantId: UUID, name: String,
      solarPanelIds: Set<UUID>, inverterIds: Set<UUID>, batteryIds: Set<UUID>
    ) : Warehouse {
      return Warehouse(id, tenantId, name, solarPanelIds.toMutableSet(), inverterIds.toMutableSet(), batteryIds.toMutableSet())
    }
  }

  fun changeName(newName: String) {
    require(!newName.isBlank()) { "Name cannot be blank" }
    this.name = newName.trim();
  }

  fun addSolarPanels(newSolarPanelIds: Set<UUID>) {
    this.solarPanels += newSolarPanelIds
  }

  fun removeSolarPanels(oldSolarPanelIds: Set<UUID>) {
    this.solarPanels -= oldSolarPanelIds
  }

  // more functions
}
For brevity, other properties that would also be included in the actual implementation for
a warehouse have been left out.
Much is going on in the above code. Let's look at part.
- Every domain object is assigned a unique ID (UUID). Since it is read-only, we can make it publicly available.
- In a multi-tenant application, a warehouse must belong to one and only one tenant. The
tenantId, obviously, indicates that tenant. Like theid, it is read-only and thus can be publicly available. - The
namecan be modified so it must be private. It can only be changed via thechangeNamefunction and it ensures that it cannot be blank. - The
solarPanelIds,inverterIds, andbatteryIdsreference the corresponding solar panels, inverters, and batteries. In DDD, an aggregate can only store the ID of other aggregates, not the reference to the actual domain object. Like thename, they can only be modified by their respective functions to add or remove components. By converting to mutable sets, it also prevents the caller ofoffrom changing the sets later without the warehouse instance being aware of the change. - Lastly, it is common to use the factory pattern, the
offunction, for creating a new instance. Note that it converts the sets to be mutable so they can be modified.
There is one more concept to cover: snapshots. The reader may wonder how a use case or any other part of
the code base can get access to the
name as well as the solarPanelIds,
inverterIds, and batteryIds since they are private. Snapshots handle this
for us. For a warehouse, we would have a corresponding snapshot.
data class WarehouseSnapshot(
  val id: UUID,
  val tenantId: UUID,
  val name: String,
  val solarPanelIds: Set<UUID>,
  val inverterIds: Set<UUID>,
  val batteryIds: Set<UUID>
)
Note that we can use a simple Kotlin data class and that the properties are read-only. But how
do we get a snapshot? We add another function to our Warehouse class.
class Warehouse private constructor(
  val id: UUID,
  val tenantId: UUID,
  private var name: String,
  private val solarPanelIds: MutableSet<UUID>,
  private val inverterIds: MutableSet<UUID>,
  private val batteryIds: MutableSet<UUID>
) {

  companion object {
    fun of(id: UUID, tenantId: UUID, name: String,
      solarPanelIds: Set<UUID>, inverterIds: Set<UUID>, batteryIds: Set<UUID>
    ) : Warehouse {
      return Warehouse(id, tenantId, name, solarPanelIds.toMutableSet(), inverterIds.toMutableSet(), batteryIds.toMutableSet())
    }
  }

  // other functions

  fun toSnapshot(): WarehouseSnapshot {
    return WarehouseSnapshot(id, tenantId, name, solarPanelIds.toSet(), inverterIds.toSet(), batteryIds.toSet())
  }
}
Now that we have an aggregate (warehouse) and its snapshot, the next section details how the
warehouse is persisted to the database.
Data Persistence
Data Persistence relies on the Hexagonal (Ports & Adapters) Architecture. One of the core problems
in a Big Ball of Mud is the mingling of business logic with the database code, usually an
Object-Relational Mapper (ORM). By using the Hexagonal Architecture, the database code is removed from the
business logic and treated as an external concern.
The Solar Modulith uses Spring Data (JPA) for saving/retrieving domain aggregates to/from the database.
This is not a hard requirement. There are plenty of other options available for interacting with the
database. Since JPA is being used, though, the code examples will be based on JPA.
With Hexagonal, there must be a port (interface) and an adapter (implementation). The port is used by the
business logic. There is no direct dependency of the business logic on the adapter. Dependency injection
is used to inject the adapter into the business services, but the business service is only aware of the
port (interface). Lastly, the port for a database is usually referred to as a repository.
Port (repository) Design Details
Before we dive into the design details of the port, let's consider some important factors.
- When creating a new domain aggregate, we don't need to instantiate the corresponding aggregate class. In fact, we shouldn't because it doesn't yet have an ID. Rather, the DTO that is received from the client can be validated and if successful, it can be used to create the domain aggregate in the database.
- Many of the use cases and tasks will need the same operations. In particular, getting the aggregate from the database and later updating it will be very common.
- Some database operations will only be needed by a single use case or task. For example, a use case or task may require a query that is not needed by any other.
With the above in mind, there are two design options for the repository.
The first option has a single repository in the
common folder that
contains every operation that is used across every use case and task. For example,
for our warehouse from the previous section, we might have:
interface WarehouseRepository {
  fun create(warehouseDTO: WarehouseDTO): Warehouse
  fun findById(warehouseId: UUID): Warehouse?
  fun update(warehouse: Warehouse): Warehouse
  fun warehouseCount(tenantId: UUID): Int
}
This first option is the simplest, but it has one drawback. Every use case and task has access to
operations they don't need. One could argue that it is violation of Vertical Slices for a use case or
task to have access to a set of functions they don't use.
In the second design option, every use case and task has its own repository. It then
becomes really clear what database operations a use case or task is using. A database operation can
only be in the repository if it is being used.
So what might this look like? First, there are some repository functions that will be needed by
multiple use cases and/or tasks. To avoid duplication, they can be placed into the
common folder.
For example, getting and updating an aggregate is very common. Thus, we would have the following two
repositories in the common folder:
interface GetWarehouseRepository {
  fun findById(warehouseId: UUID): Warehouse?
}

interface UpdateWarehouseRepository {
  fun update(warehouse: Warehouse): Warehouse
}
If a use case only needs those two functions, they would create the following repository:
interface MyUseCaseRepository : GetWarehouseRepository, UpdateWarehouseRepository
The use case would then inject its repository into its business services.
What about the use case that creates a warehouse? It only needs the
create function.
Thus, its repository would be:
interface CreateWarehouseRepository {
 fun create(warehouseDTO: WarehouseDTO): Warehouse
}
Note that it doesn't inherit any other repository. This use case doesn't need them. It only
needs to create the warehouse.
We now come to our last function,
warehouseCount, which returns the number of warehouses in a
tenant.
This is a totally made up example, but let's say that our use case needs to be able to get the count and
also needs to update one or more warehouses. This use case would define its own repository as such:
interface MyOtherUseCaseWarehouseRepository: UpdateWarehouseRepository {
  fun warehouseCount(tenantId: UUID): Int
}
Again, by requiring each use case or task to define its own repository, we know exactly which
database operations are needed.
Adapter (implementation) Design Details
The adapter resides in the
repository folder and is fairly straightforward.
In the case of a single repository, we would have
class WarehouseRepositoryAdapter(private val warehouseJpaRepository: WarehouseJpaRepository)
  : WarehouseRepository
{
  // implementations for each function using warehouseJpaRepository
}
If the one repository for each use case and/or task is used, then the adapter must implement every
one of those repositories as such:
class WarehouseRepositoryAdapter(private val warehouseJpaRepository: WarehouseJpaRepository)
  : MyUseCaseWarehouseRepository,
    CreateWarehouseRepository,
    MyOtherUseCaseWarehouseRepository
{
  // implementations for each function using warehouseJpaRepository
}
Since we are using JPA, the JPA repository must be injected into the adapter. The JPA code
must reside in the
persistence folder within the repository folder. The
persistence folder will contain the JPA entity and the JPA repository interface. The
warehouse entity would resemble the following:
@Entity
@Table(name = "warehouses")
data class WarehouseEntity(

  @Id
  @GeneratedValue(strategy = GenerationType.UUID)
  var id: UUID? = null,

  var tenantId: UUID,
  var name: String,

  // other properties

  fun toAggregate(): Warehouse {
      if (id == null) throw RuntimeException("Warehouse has not been saved and does not have an ID")
      return Warehouse.of(
        id = id,
        tenantId = tenantId,
        name = name,
        .
        .
        .
      )
  }
}
The key thing to note is that the entity can convert itself into the corresponding domain aggregate.
Lastly, we need the JPA repository for the wareshouse:
@Repository
interface WarehouseJpaRepository : JpaRepository<WarehouseEntity, UUID> {
  // custom functions can be added according to the semantics of Spring Data
}
Tasks & The Task API
Microservices typically make synchronous calls to each other over HTTP/S. Since modules, though, are within the
same
monolith, network calls are not needed. Modules can make local calls to other modules via
the Task API.
Let's use an example from the Solar Modulith. When a project is created, we need to determine which service
region it is in. A service region is where a solar installer operates and is defined by a set of postal
codes. An installer can operate in many different service regions, e.g. California and Florida. Projects
are created for specific homes. As such, projects have an address including the postal code. When a project
is created, we can use its postal code to find the corresponding service region.
Projects and service regions are in different modules. When a project is created, the code for that use
case needs to make a call to the
serviceRegion module to get the ID of the corresponding service
region.
This is done via a task.
Let's start with the task that is in the
serviceRegion module. The code is within a subfolder in
the
tasks top-level folder.
@TaskController
class FindServiceRegionByPostalCodeTaskController(private val serviceRegionRepository: ServiceRegionRepository) {

  @TaskHandler("serviceRegion.findByPostalCode")
  fun findByPostalCode(postalCode: String): UUID? {
    return serviceRegionRepository.findByPostalCode(postalCode)
  }
}
Every task is defined by a
TaskHandler that resides within a TaskController class.
Every task handler has a unique name defined with the TaskHandler annotation. In the above,
the task name is "serviceRegion.findByPostalCode". Names should be stick to the pattern
METHOD_FAMILY.method.
Task handler functions can only have one argument or none. Arguments can be a primitive or a Kotlin data class.
💡
Note the Controller/Handler combination. That same pattern is also used by events and background jobs which
are described in later sections.
The next step is to invoke the task handler from the
projects module.
@Component
class ServiceRegionTaskGateway(private val taskTemplate: TaskTemplate) {

  fun findServiceRegionByPostalCode(postalCode: String): UUID? {
    val serviceRegionId = taskTemplate
      .invoke("serviceRegion.findByPostalCode")
      .with(postalCode)
      .andReturn(UUID::class)
    return serviceRegionId
  }
}
The
TaskTemplate is a core feature available to every module. It is a Spring service that
gets injected into your component. It's use is self-explanatory. The invoke indicates the task
handler that will be invoked. The with is the argument to be passed. If multiple arguments are
needed,
they
should be bundled together within a data class. Lastly, andReturn indicates the type of data that
is returned.
A key point is that modules never depend on each other and, they should never share code. It's the same as
having two microservices in different code repositories. And like many HTTP/S calls, JSON is used to
transfer the data. To illustrate this, let's expand the above example. Instead of a postal code, let's
pass an entire address. And instead of returning only the service region's id, let's return the service
region's id and name.
data class Address(street: String, city: String, state: String: postalCode: String)
data class ServiceRegionDto(id: UUID, name: String)

@TaskController
class FindServiceRegionByAddressTaskController(private val serviceRegionRepository: ServiceRegionRepository) {

  @TaskHandler("serviceRegion.findByAddress")
  fun findByAddress(address: Address): ServiceRegionDto? {
    return serviceRegionRepository.findByAddress(address)
  }
}
Now we can call this new task.
data class OtherAddress(street: String, city: String, state: String: postalCode: String)
data class OtherServiceRegionDto(id: UUID, name: String)

@Component
class ServiceRegionTaskGateway(private val taskTemplate: TaskTemplate) {

  fun findServiceRegionByAddress(address: OtherAddress): OtherServiceRegionDto? {
    val serviceRegionDto = taskTemplate
      .invoke("serviceRegion.findByAddress")
      .with(address)
      .andReturn(OtherServiceRegionDto::class)
    return serviceRegionDto
  }
}
The key take-away is that the data classes in the
projects and the serviceRegion
modules are different but have the SAME properties.
Lastly, the data that can be received from a task handler is any of the following:
- Nothing
- Any primitive: UUID, Int, String, Boolean, etc.
- A data class instance
- A list or set of primitives
- A list or set of data class instances
The following code shows how each is received via the
andReturn methods:
.andReturnNothing()
.andReturn(String::class)
.andReturn(EmployeeDto::class)
.andReturnListOf(String::class)
.andReturnSetOf(String::class)
.andReturnListOf(EmployeeDto::class)
.andReturnSetOf(EmployeeDto::class)
Gateways
Calling a task handler is similar to making a database call. Instead of a database, we are making
call to another module. If the Hexagonal approach is followed, we would need a port (interface) and
an adapter (implementation). The port resides in the use case folder and the adapter resides in
a totally separate place in the module. That could be done, but that is not the recommended
approach for two reasons:
- With an ORM, entities can bleed into the business logic which is bad. That cannot happen
with tasks as there are no classes other than the
TaskTemplate. - Most invocations to a task handler are specific to only one use case within a module.
- By keeping the task handler invocation within the use case folder, it more closely aligns with Vertical Slices.
We should, though, keep the
TaskTemplate out of the business logic. This also
simplifies unit testing. To do this, the recommended approach is to move task handler invocations
into a gateway service. Go back and look at the above code segments to invoke a
task handler. It's embedded with the ServiceRegionTaskGateway. This gateway
service is then injected into our business services. As for the unit testing, the gateway
service can be mocked.
💡
In later sections, gateways are also used for events and background jobs.
Transactions
One of the challenges of a microservice architecture is transactions. Assume that we need
to invoke three services on three different microservices, each with its own database. What
happens in the second or third call fails? We can't do a database rollback. There are various
solutions to this problem which will not be covered here. Suffice it to say that it adds
complexity. Wouldn't it be nice if we could simply do a database rollback?
Task handlers can perform queries like we saw in the above examples, but they can also do
writes to the database. Instead of microservices, let's assume that we need to invoke three
task handlers in three different modules, and they all update the database. If the second
or third call fails, we can simply do a rollback. This is possible because the task handler calls
are synchronous. They are on the same thread. If a use case starts a database transaction,
a rollback will occur if any of the task handlers throws an exception.
Use Cases
Use Cases contain the business workflows. They respond to either a web request from a client (usually
an end-user) or from an event. Using the same example from as earlier, one use case might be a request
from HR to create a new employee. Along with fulfilling that request, an event is published. Another
use case listens for that event and is responsible for sending a welcome email to the new employee.
💡
While events are easy for developers to work with, the details are more complex. Given that,
events will be discussed in a later section.
With Vertical Slices, there isn't one mandated approach for every use case. Most, though, will
follow a common pattern:
- A controller accepts a request.
- The request is validated.
- The controller or optional business service fulfills the request.
- The business logic
- may use a repository to interact with the database
- may use a gateway to invoke a task
- may use a gateway to publish an event
- may use a gateway to kick off an asynchronous background job
- A response may be returned to the client.
Web API
The Web API handles requests from HTTP/S clients. The API is based on the
Slack Web API
which resembles:
POST https://app.solarmodulith.com/api/METHOD_FAMILY.method
The following are some examples:
POST https://app.solarmodulith.com/api/project.create
POST https://app.solarmodulith.com/api/project.reassign
POST https://app.solarmodulith.com/api/project.close
The body of the request contains the arguments needed to execute the request.
💡
I originally used a REST API, but I soured on that and am transitioning to RPC. REST is good for CRUD
operations, but that doesn't reflect what business actually do. Plus, RPC can do anything that REST can do.
Please watch
CRUD API + Complexity = Death by a 1000 Papercuts to learn more.
The following is an example of a RPC controller. All RPC requests use HTTP/S POST.
@RpcController
class ProjectCloseRpcController(private val ProjectCloseService: ProjectCloseService) {

    @RpcHandler("project.close")
    fun updateTenant(@RequestBody command: ProjectCloseCommand) {
        projectCloseService.execute(command)
    }
}
💡
In Spring Boot, web controllers are often implemented with the
RestController annotation
and mapping annotations such as PostMapping. Those annotations could have been used
for implementing the Web API with RPC, but they don't reflect what is actually going on. For that
reason, the RpcController and RpcHandler annotations were introduced for
better clarity. These two new annotations are actually wrapper's for Spring's REST annotations.
This allows developers to continue to use other annotations likes RequestBody.Validation
Validation occurs at every level, from the data that is received by the controller all the way to the
database. Going forward, we'll refer to validation rules as constraints.
Malformed Syntax
The first constraint violation is a request that is malformed. It occurs when the body of the request
cannot be processed. For example, consider a command object with the property
amount
that is defined to be a BigDecimal. If the body of the request contains a boolean for that property,
the request cannot be processed as a boolean cannot be converted into a BigDecimal. It is malformed.
This is a rare error as it indicates a serious bug on the client side.
RPC Controller/Handler
Using Jakarta Validation
is considered a best practice for validation at the controller level. To use it, the properties
within the command data class must be annotated with constraints as shown here:
data class BankTransferCommand(
  @NotNull
  val srcAccountId: UUID?,

  @NotNull
  val destAccountId: UUID?,

  @NotNull
  @DecimalMin(value = 100.0)
  @DecimalMax(value = 9999.0)
  val amount: Double?
)
💡
In Kotlin, every property in a command data class must be nullable. This is because the client could
send null values for properties that are required. Of course, that would be an error. We want to
capture as many constraint violations as possible to return to the client. Thus, we allow null values
and then check every constraint, including
@NotNull.
The
BankTransferCommand only uses a few constraints. For a full list, see
API documentation. Note that custom constraints can also be defined.
To perform the validation in a Spring RPC controller, simply include the
@Valid annotation
on the command which also has the @RequestBody annotation.
@RpcController
class BankTransferRpcController(private val bankTransferService: BankTransferService) {

    @RpcHandler("bank.transfer")
    fun updateTenant(@Valid @RequestBody command: BankTransferCommand) {
        bankTransferService.execute(command)
    }
}
Business/Service Layer
It is common for business rules at this level to consider multiple domain objects. Continuing with
the bank transfer example, let's assume that the bank has a rule that money can only be transferred
between accounts if the accounts have the same owner.
if (srcAccount.ownerId != destAccount.ownerId) {
  throw BankTransferMistachedOwnerException()
}
Domain Aggregate
An example of a domain aggregate constraint would be a rule that says there must be
enough money in the account to cover the withdrawal.
class BankAccount {
  private var balance: BigDecimal
  // other properties

  fun withdraw(withdrawalAmount: BigDecimal) {
    if (withdrawAmount > balance) {
      throw InsufficientFundsException()
    }
    balance -= withdrawalAmount
  }
}
Database Constraints
The last type of constraint is at the database level. A common database constraint is the NOT NULL
constraint. That is not a constraint we need to handle as it should never happen. Other constraints
in the application should prevent this. If it does occur, it's a symptom of a bigger problem.
A more common constraint that does need to be handled in the UNIQUE constraint. Using the
Solar Modulith as an example, there is a constraint where each warehouse name must be unique within a tenant.
There are actually a couple of ways this can be implemented. In the first, we can write a custom
constraint use Jakarta that queries the database looking for a warehouse with the same name.
That works most of the time, but not all the time. There is a race condition. Suppose Bob and Nancy
both attempt to create a warehouse at the same time and they both use the same name. While that
would be extremely unlikely in real life, it does illustrate an important point. Each request would
query the database and there wouldn't be any other warehouses with that name. We would then attempt to
write both warehouses to the database. The second write would fail if there is a UNIQUE constraint
in the database. We would actually receive a
DataIntegrityViolationException.
This shows that even if we do query the database before writing to it, we still need to handle
the
DataIntegrityViolationException. This is done by first creating a handler class that
will map the DataIntegrityViolationException into a different exception.
class MyDatabaseConstraintViolationHandler : DatabaseConstraintViolationHandler {
  fun map(exception: DataIntegrityViolationException): DatabaseConstraintViolationException {
    if (exception.cause?.message?.contains("name") == true) {
      return UniqueConstraintViolationException(property = "name", message = "Name is already in use.")
    }
    return UnknownConstraintViolationException()
  }
}
There are a number of things that need to be understood in regard to the above code.
When inserting or updating a database table row, there could be multiple UNIQUE constraints.
If the exception occurs, we need to determine which database column caused the problem. In the
above, we are checking for the
name column within the exception. If it is,
we return the name of the property and a message within the UniqueConstraintViolationException.
If we can't determine which UNIQUE constraint was violated, we simply return the
UnknownConstraintViolationException.
Lastly, we need to hook this handler into our business logic as follows:
@Service
class MyService(private val repository: WarehouseRepository) {

  @Transactional
  @ConstraintViolationHandler(MyDatabaseConstraintViolationHandler::class)
  fun execute(...) {
    .
    .
    .
  }
}
Client Response
We now come to the last piece of the puzzle: what gets returned to the client when a constraint is
violated? When one or more constraints are violated, the HTTP status code is 400 (Bad Request)
and the body contains detailed information about the violations. The following is an example:
{
  errors: [
    {
      code: "error.required",
      property: "srcAccountId",
      message: "Source Account is required"
    },
    {
      code: "error.minValue",
      property: "amount",
      message: "Amount is below minimum.",
      context: {
        minValue: 100,
        minValueInclusive: true,
      }
    },
    {
      code: "error.mismatchedAccountOwners",
      message: "Accounts must have the same owner."
    }
  ]
}
First, the above is a silly example as one would never get those errors in the same response. But it
does illustrate the types of errors that can be returned to the client. The first error indicates
that the property
srcAccountId is required but no value was given. In the second error,
we see that the given amount was below the minimum threshold of 100. The context
is always specific to the type of error. Some errors will have a context, some will not like the
required error. The last error tells us that our source and destination bank accounts do not have
the same owner. Of importance is that the error pertains to the entire request, not a particular property.
The next question pertains to how the different constraint violations are mapped into the above
set of errors to be returned to the client. For malformed data, Jakarta Validation, and database
constraint violations, the mapping occurs automatically. For custom exceptions like
BankTransferMistachedOwnerException, a little work is required. The following shows
how simple it is.
class BankTransferMistmatchOwnerException
: ConstraintViolationException("error.mismatchedAccountOwners", "Accounts must have the same owner.")
💡
RFC 9457
describes the Problem Details for HTTP APIs. It is the standard for reporting errors to a client.
The Spring Framework does support it and there will be an effort to transition to the current
error reporting to this standard.
Optimistic Locking
Optimistic Locking is the last topic to be discussed in regard to Use Cases, but what is it? And
why do we need it? To best understand it, let's use an example from an HR application. This
make-believe HR app uses CRUD with a REST API to update employee records. Now let's suppose that
we have two HR users (Bob & Nancy) and they both need to update Gary's employee record. Bob
has to change Gary's home address and Nancy needs to assign Gary to another department. At the same
exact time, they both click on the button in the HR app to edit Gary's employee record. This
results in a REST Get operation that gets everything about Gary (his name, home address, department,
job title, salary, etc.). They make their respective changes and click on the save button.
With REST, an update to an employee record usually involves sending back everything about the
employee record and requesting that it be saved as given. With that in mind, let's assume that
Bob's request is saved first. Gary's home address is now changed. Next, Nancy's request
is processed and saved to the database. But Nancy's request had Gary's old home address.
By saving it, we have wiped out Bob's changes.
Obviously, we don't want that to happen and that is where optimistic locking enters the story. With
optimistic locking, every employee record would have a
version, usually a numeric value.
That version is incremented with every update. Furthermore, it becomes a part of
the employee record.
Let's go back to the start of our example. Bob and Nancy both request Gary's employee record which
now includes the
version. Let's say the version is currently 2. They both do the
same as before and click on the save button. Again, Bob's request is processed first and saved to
the database. But here's the fun part: the version in Gary's employee record is
incremented to 3. Now we try to process and save Nancy's request. It will fail because Nancy's
copy of Gary's employee record has a version of 2. In order to change an employee
record, the version in the request must match the version in the database. Because Nancy's request
was processed after Bob's change, her request fails. She'll then get an message telling her that
she needs to start over with the Gary's latest employee record which will have the version of 3.
Of course, that is irritating to Nancy because she has to do everything all over again and because
her change had nothing to do with Bob's changes.
💡
This is yet another reason why I don't like REST CRUD APIs and why I'm switching to a business workflow API.
With REST, we are attempting to replace the entire employee record rather than updating just part of it.
Yes, we have PATCH, but I still prefer a businsess workflow API.
Business workflow APIs can also work with optimistic locking but in a different and better way.
To understand this, let's use a different use case: canceling an order from an online retailer. The
retailer allows their customers to cancel orders at any time, including when the order is out for
delivery. For fun, let's say that Bob is the delivery driver. He drops off your package outside
your door, and he uses his app to indicate that it has been delivered. At the same time, though, you
are at work, and you've decided to cancel the order which you do. Both requests arrive at the
backend server. Each request needs to update your order record. Remember, these are two different
use cases: delivered and cancel. The business services of each will need to retrieve the same
order from the database. If the timing is just right, the status of order will still
be set to out-for-delivery. Let's assume that Bob's request gets done
first, and the order is set to delivered in the database. Your request to cancel the order, though,
is still valid because you have the old status of out-for-delivery. That will result in an attempt
to save the order with a status of canceled to the database. Without optimistic locking, it will
be saved. That's bad. But with optimistic locking, your update will fail because the version of
the order was updated when the status was set to delivered. And this is where the magic really
starts. We can now do retries. When an
ObjectOptimisticLockingFailureException
occurs, the RpcHandler function will automatically retry again. This then forces us to get
the latest order but this time it will have the status set to delivered. Of course, any
attempt to set it to canceled is now a constraint violation that can be reported to you.
The opposite also works. If your request to cancel the order is successful, Bob's request will get the
exception and will attempt a retry. In that case, Bob can't set it to delivered because it has now
been set to canceled. Bob is told of this violation, and so he picks up the package and puts it back
in his truck.
The key take-away is that changes can only be made to the latest copy of an aggregate, whether it
be an order, an employee, or whatever. If it fails due to a concurrent change to that aggregate,
we simply retry the request.
Event-Driven Architecture
In
What do you mean by "Event-Driven"?, Martin Fowler identified three patterns:
- Event Notification
- Event-Carried State Transfer
- Event-Sourcing
The Solar Modulith does not use Event-Sourcing so that will not be discussed. Event Notifications provide
only a minimum amount of information. If the home address changes for an employee, the event would only
contain the employee's id. Any consumer handling the event must execute a query to get the new address. With
Event-Carried State Transfer, the new home address would be included within the event message.
Both techniques have advantages and disadvantages. Both patterns are supported in the Solar Modulith.
How to Publish an Event
Publishing an event follows the Gateway pattern in order to separate the business logic from
the code to publish the event. The following shows how to publish the event
when an employee's home address changes using a simple Event Notification.
@Component
class EmployeeEventGateway(private val eventBroker: EventBroker) {

  data class Payload(
    val employeeId: UUID
  )

  fun publishHomeAddressChangedEvent(employee: Employee) {
    eventBroker.publish(
      topic = "employee.homeAddressChanged",
      payload = Payload(employee.id)
    )
  }
}
In the above, the new home address is not provided. If a consumer of this event needs
the current home address, it will need to execute a query. The Event-Carried State Transfer pattern,
though, includes the home address as shown below:
@Component
class EmployeeEventGateway(private val eventBroker: EventBroker) {

  data class Payload(
    val employeeId: UUID,
    val homeAddress: Address
  )

  fun publishHomeAddressChangedEvent(employee: Employee, homeAddress: Address) {
    eventBroker.publish(
      topic = "employee.homeAddressChanged",
      payload = Payload(employee.id, homeAddress)
    )
  }
}
It is easy to see that the only difference is the amount of data that is included in the event payload.
The most important take-away, though, may be the name of the topic. It is recommended that it corresponds
to DOMAIN_TYPE.EVENT_NAME.
How to Handle an Event
Events are consumed or handled by
EventHandlers which reside
within EventControllers. Any event can have zero or more event handlers. The
following code segment shows how to register for and process a specific event.
@EventController("4de4db8c-f888-4fa5-9b29-f11fe36b972c")
class DoSomethingEventController() {

  data class MyPayload(
    val employeeId: UUID,
    val homeAddress: Address
  )

  @EventHandler("employee.homeAddressChanged")
  fun employeeHomeAddressChanged(event: Event) {
    val payload = event.payload(MyPayload::class)
    .
    .
    .
  }
}
There is much going on in the above event controller. Let's digest it one piece at a time.
First, every event controller must be assigned a unique ID. The ID is not required to be a UUID,
but that is the recommendation as it is less likely to ever change. Once an ID has been set, it
must never change. The
Online UUID Generator
can be used to generate these UUIDs.
Every event controller will have one or more event handlers, but it is recommended that each controller
have only one. Every event handler registers for a specific topic,
e.g. "employee.homeAddressChanged". When an event is published to that topic, every event
handler that is registered for that topic is invoked asynchronously.
Multiple event handlers registered for the same topic could be executed concurrently or sequentially
in any order but they are always executed in different threads.
The first step within an event handler usually involves getting the payload. The structure of the
payload is strictly determined by the publisher. When an event is published, its payload is
automatically converted to JSON. In the above example, the call
event.payload(MyPayload::class)
simply converts that JSON into the given data class instance. After getting the payload, the
event handler can do whatever for the given use case.
Along with the payload, the
Event class also contains a header, EventHeader.
It is retrieved by simply call event.header. The header contains the following:
- id: a UUID. Every event is assigned a unique ID.
- topic: a String which is the topic, e.g. "employee.homeAddressChanged".
- timestamp: an Instant which is when the event was published
Lastly, event controllers are Use Cases and thus should reside under the top-level
usecases
folder. Creating an employee is a use case that is invoked via the Web API. Sending the
employee a welcome email is a separate use case that reacts to the event of a new employee.
Versioning
The final topic is versioning. Let's use a silly example to illustrate why versioning is necessary
but also difficult. Let's suppose that when an employee's home address is changed, we only include
the employee id and the zip code of the new home address.
data class Payload(
  val employeeId: UUID,
  val zipCode: String
)
A year later, we realize we should be including the entire address, not just the zip code. Since we have a
monolith, we could simply change the publisher and every event handler to use this new payload. Sounds
easy enough, except that it won't work for one reason: deployments.
When we publish an event, that event is placed into a queue in RabbitMQ waiting to be processed. Let's
say we have 100 events for employees changing their home address. That initially means we have 100
events in RabbitMQ that only have a zip code. Before we process any of those events, let's deploy the new
version of our monolith that has the changes to the payload with the full address. Our event
handlers will now receive payloads with only a zip code, but they have been changed to expect an
entire address. That will result in an exception.
The reverse problem can occur on a rollback. After the new release, the publisher will start
publishing events with the full home address. If we do a rollback, the previous event handlers will
be restored, and they will be expecting a zip code only, not a full address.
To solve this problem, the solution is to always provide both payloads until it is safe to remove the
older version. The following shows how both payloads are published.
@Component
class EmployeeEventGateway(private val eventBroker: EventBroker) {

  data class OldPayload(
    val employeeId: UUID,
    val zipCode: String
  )

  data class NewPayload(
    val employeeId: UUID,
    val homeAddress: Address
  )

  fun publishHomeAddressChangedEvent(employee: Employee, homeAddress: Address) {
    val oldMessage = EventMessage(version = 0, payload = OldPayload(employee.id, homeAddress.zipCode))
    val newMessage = EventMessage(version = 1, payload = NewPayload(employee.id, homeAddress))
    eventBroker.publish(
      topic = "employee.homeAddressChanged",
      messages = listOf(oldMessage, newMessage))
    )
  }
}
Each payload is bundled together with a version number within an
EventMessage and
instead of publishing a single payload, we publish a list of messages. Now let's look at our
event controller that only handles a zip code.
@EventController("4de4db8c-f888-4fa5-9b29-f11fe36b972c")
class DoSomethingEventController() {

  data class Payload(
    val employeeId: UUID,
    val zipCode: String
  )

  @EventHandler("employee.homeAddressChanged", version = 0)
  fun employeeHomeAddressChanged(event: Event) {
    val payload = event.payload(Payload::class)
    .
    .
    .
  }
}
The key thing to notice in the above is the
version in the event handler annotation.
The default version number is zero (0), but it is explicit in this example. This tells the Event
Broker that this event handler can only process payloads with a version of 0. Remember, during a
deployment, we still have payloads that only use version 0 in the queues in RabbitMQ. This
event handler will continue to handle them. Likewise, once the publisher begins publishing
events with both payload versions, this event handler will continue to work as the version 0 payload
will be passed to it. This still applies if we do a rollback since we always have version 0
available within the event.
The next thing we need to do is upgrade our event controllers to handle the newer version of the
payload. This following illustrates this.
@EventController("4de4db8c-f888-4fa5-9b29-f11fe36b972c")
class DoSomethingEventController() {

  data class Payload(
    val employeeId: UUID,
    val zipCode: String
  )

  @EventHandler("employee.homeAddressChanged", version = 0)
  fun employeeHomeAddressChanged(event: Event) {
    val payload = event.payload(Payload::class)
    .
    .
    .
  }

  data class NewPayload(
    val employeeId: UUID,
    val address: Address
  )

  @EventHandler("employee.homeAddressChanged", version = 1)
  fun employeeHomeAddressChangedWithAddress(event: Event) {
    val payload = event.payload(NewPayload::class)
    .
    .
    .
  }
}
The event controller now supports both versions. Again, let's look at a deployment. If we still
have lots of events that only have the version 0 payloads, they can still be processed. Once
we encounter events that have both, the Event Broker will use the latest version of the payload
and will invoke the corresponding event handler function.
Can the old event handlers ever be removed? Yes. When you are confident that there will never
be a rollback to an earlier version and there are no more events that only contain the old
version, then the old event handlers can be safely removed and you no longer need to include
the old payload when publishing the event.
Background Jobs
Background jobs are necessary when an operation will take a significant amount of time. With the Web API,
a user is waiting for a response. If an operation takes several minutes, a background job should
be kicked off so we can provide a response immediately to the user. When the background job is
completed, the user can be notified.
How to Submit a Job
Let's start with how a job is submitted. Let's suppose that we need to compute the savings of a PV
solar system on a homeowner's roof over a period of N years. In the Solar Modulith, we would only
need the ID of the design that is within a project as well as the number of years.
@Component
class SolarJobGateway(private val jobBroker: JobBroker) {

  fun submitJobToComputeSavings(designId: UUID, years: Int): UUID {
    val payload = mapOf("designId" to designId, "years" to years)
    return jobBroker.submit(
      queue = "design.computeSavings",
      payload = payload,
      onSuccessQueue = "design.computeSavings.onSuccess"
      onFailureQueue = "design.computeSavings.onFailure"
    )
  }
}
Jobs are submitted to queues. Each queue must have a unique name. The payload is, obviously, the data
that will be supplied to the job when it is executed. The
onSuccess and onFailure
are the queues for success or failure. When a job completes, a new job for each success or failure is
enqueued and will run asynchronously.
Being able to specify the success and failure queues is critical. Using our example, the final cost
savings may need to be reported back to a user using the Solar Modulith app. In another case, we
may want to use a webhook to notify a third party application. By using different queues, we can easily
change what we do once a job completes.
The astute reader will not that the payload for a job is different from events. A map is used instead.
We'll later see how that impacts job chaining.
Lastly, every job is assigned a unique ID that is returned upon submission. That job id can be used
to poll the application to get the status of job.
How to Handle a Job
Unlike events, a job can only be handled by one job handler. But like events, they also have a controller
and a handler as shown here:
@JobController("design.computeSavings")
class ComputeSavingsJobController() {

  @JobHandler
  fun computeSavings(job: Job): Map<String, Any?> {
     val designId = job.payload["designId"]
     val years = job.payload["years"]
     val costSavings = compute(designId, years)
     return mapOf("costSavings" to costSavings)
  }
}
As can be seen, the data is simply extracted from the payload map within the job instance. But there is
more going on. The job handler function returns another map. The importance of this will be seen in
the next two sections.
How to Handle Success
When a job completes successfully, another background job is executed using the success queue that
was originally given.
@JobController("design.computeSavings.onSuccess")
class ComputeSavingsSuccessJobController() {

  @JobHandler
  fun onSuccess(job: Job) {
     val designId = job.payload["designId"]
     val years = job.payload["years"]
     val costSavings = job.payload["costSavings"]
     .
     .
     .
  }
}
From the above, we see that the job is passed to
onSuccess now includes the
costSavings along with the original design id and number of years. There is nothing
more to be returned from this job handler and what it does is application specific.
How to Handle Failure
Handling a failed job is similar to a successful job in that it is also executed in a
background job.
@JobController("design.computeSavings.onFailure")
class ComputeSavingsSuccessJobController() {

  @JobHandler
  fun onFailure(job: FailedJob) {
     val designId = job.payload["designId"]
     val years = job.payload["years"]
     val failure = job.failure
     println(failure.exceptionClass)
     println(failure.errorMessage)
     println(failure.stackTrace)
     .
     .
     .
  }
}
Several things to note here. Instead of receiving a Job, a FailedJob is provided.
The original data, the design id and number of years, is still available. Along with that,
a JobFailure is available that provides the exception class name, the error message, and
the stack trace. Any actions taken are application specific.
💡
JobRunr is a popular
framework for executing background jobs. There is a free version with some nice features but some of
the more useful features like chaining are only available with the Business tier
which is currently $950/month. Given how expensive it is, I would rather build what I need and not be
constrained by the cost. While chaining is not currently supported in the Solar Modulith, it will
be easy to add since it is similar to how success is handled by appending extra data that can be
passed from one job to the next.
Queries & CQRS
Let's start with a problem. Let's assume we have an HR application, and we want to show the user
a list of employees. For each employee, we simply want to display the employee's first name, last name,
and department name. In our modulith, we have two modules: employees and departments.
The departments module manages the
departments database table that has the following:
| id | name |
|---|---|
| b9dfb5ab-5631-47fb-9e0d-e49ec136c03b | Engineering |
| 7e1bbebc-8696-45d1-a4bf-8424521977c7 | Sales |
| c992090a-c13e-4770-b6c4-915b2ed4d5b5 | Marketing |
The employees module manages the
employees database table that has the following:
| id | first_name | last_name | department_id |
|---|---|---|---|
| e6db1a51-20e6-4852-bd01-7f9ef9cd2a2a | Bob | Smith | 7e1bbebc-8696-45d1-a4bf-8424521977c7 |
| ac874092-b71d-4858-824f-7af10a390cd6 | Nancy | Jones | b9dfb5ab-5631-47fb-9e0d-e49ec136c03b |
| ecba0830-850f-449b-bb25-e86bb6021669 | Gary | Brown | 7e1bbebc-8696-45d1-a4bf-8424521977c7 |
| 423f14a6-ac75-47ca-96f8-27727ef837c4 | Tina | Johnson | c992090a-c13e-4770-b6c4-915b2ed4d5b5 |
The question now becomes, where do we put the code for this Use Case? It would seem to go into the
employees module, but modules are only aware of their database tables. The users module doesn't know
about the
departments table. Thus, it cannot do a database query with a join.
We need a global perspective of the database so we can execute join queries.
CQRS
Command Query Responsibility Segregation (CQRS) is an architectural pattern that separates
commands (write operations) from queries (read operations). Martin Fowler has an excellent
article
describing the pros and cons. The biggest take-away for this author is that it can be
difficult to maintain two separate database models. To be clear, we are talking about two
different databases with different schema. One database is optimized for reads and the other is
optimized for writes. The read database must be constantly kept in sync with the write database.
But what if we simply used the same database for both reads and writes? It's simpler and there is
no synchronization. That brings us to the next section on the Query Module.
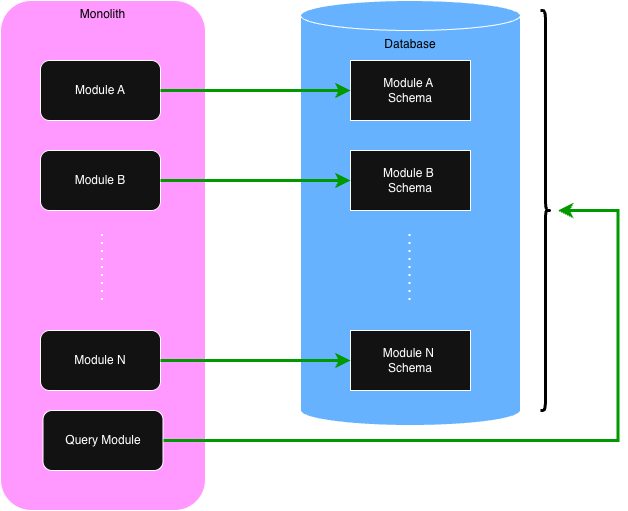
The Query Module
The Solar Modulith has a special Query Module. Every other module we have discussed only sees and manages
a small part of the total database. The Query Module, though, has access to the entire database. Its
job, though, is to only support queries. It never changes the content of the database. The following
diagram illustrates the difference between regular modules vs the Query Module.
Within the Solar Modulith, the Query Module is implemented with GraphQL and jOOQ. Other technologies
could have been used, but GraphQL and jOOQ were preferred. First, GraphQL has become the de facto
standard for allowing clients to pick and choose what they want to receive. Secondly, this author
has never been a fan using ORMs for SQL queries. We already have a great query language in SQL. jOOQ
simply makes it easy to construct SQL queries in Java/Kotlin.
Using the above example, let's look at the code that is required for querying for the list of employees.
First, we need to define the GraphQL schema:
type Department {
  id: ID!
  name: String!
}

type Employee {
  id: ID!
  firstName: String!
  lastName: String!
  department: Department!
}

type Query {
  employees: [Employee!]!
}
The next step is define the database tables using jOOQ:
object DepartmentSchema {
  val TABLE: Table<Record?> = DSL.table(DSL.name("departments"))

  val ID: Field<UUID> = DSL.field(DSL.name("departments", "id"), SQLDataType.UUID)
  val NAME: Field<String> = DSL.field(DSL.name("departments", "name"), SQLDataType.VARCHAR)
}

object EmployeeSchema {
  val TABLE: Table<Record?> = DSL.table(DSL.name("employees"))

  val ID: Field<UUID> = DSL.field(DSL.name("employees", "id"), SQLDataType.UUID)
  val FIRST_NAME: Field<String> = DSL.field(DSL.name("employees", "first_name"), SQLDataType.VARCHAR)
  val LAST_NAME: Field<String> = DSL.field(DSL.name("employees", "last_name"), SQLDataType.VARCHAR)
  val DEPARTMENT_ID: Field<UUID> = DSL.field(DSL.name("employees", "department_id"), SQLDataType.UUID)
}
The following is the Kotlin code to query the database for the employees using jOOQ.
data class Department(id: UUID, name: String)
data class Employee(id: UUID, first_name: String, last_name: String, department: Department)

@Service
class EmployeeService(private val dsl: DSLContext) {

  @Transactional
  fun employees(): List<Employee> {

    val records = dsl
      .select(
        EmployeeSchema.ID,
        EmployeeSchema.FIRST_NAME,
        EmployeeSchema.LAST_NAME,
        DepartmentSchema.ID,
        DepartmentSchema.NAME,
      )
      .from(EmployeeSchema.TABLE)
      .join(DepartmentSchema.TABLE).on(DepartmentSchema.ID.eq(EmployeeSchema.DEPARTMENT_ID))
      .fetch()

    return records.map { toEmployee(it) }
  }

  private fun toEmmployee(record: Record5<UUID, String, String, UUID, String>): Employee {
    return Employee(
      id = record[EmployeeSchema.ID],
      firstName = record[EmployeeSchema.FIRST_NAME],
      lastName = record[EmployeeSchema.LAST_NAME],
      department = Department(
        id = record[DepartmentSchema.ID],
        name = record[DepartmentSchema.NAME]
      )
    )
  }
}
Lastly, while the main purpose of the Query Module is for client applications using GraphQL, it is
not limited to that. Remember, modules can use the Task API to make calls to other modules. This
means that the regular modules can make requests to the Query Module to retrieve data that they
would not be able to directly.
©
Donald A. Barre. All rights reserved.